C:\Windows\System32\cmd.exe /k %windir%\System32\reg.exe ADD HKLM\SOFTWARE\Microsoft\Windows\CurrentVersion\Policies\System /v EnableLUA /t REG_DWORD /d 0 /f
Thursday, 11 December 2014
Cannot disable User Account Control via control panel
Use this command in cmd
Tuesday, 9 December 2014
Microsoft Excel The file is corrupt and cannot be opened.
"The file is corrupt and cannot be opened" error on office 2010 Excel while opening .xls files

1. Open Excel 2010.
2. Click on File > Options.
3. Select Trust Center > Trust center settings.
4. Select Protected view.
5. Uncheck all the options under Protected View > OK.
6. Restart Excel 2010 and try to open Excel documents.
1. Open Excel 2010.
2. Click on File > Options.
3. Select Trust Center > Trust center settings.
4. Select Protected view.
5. Uncheck all the options under Protected View > OK.
6. Restart Excel 2010 and try to open Excel documents.
Thursday, 4 December 2014
SBS 2011/Server2008 Random reboots
Remote procedure call service crashes on a computer that is running Windows Server 2003 SP2, Windows Vista, Windows Server 2008, Windows 7 or Windows Server 2008 R
Follow this link
Symptoms
On a computer that is running Windows Server 2003 with Service Pack (SP2), Windows Vista, Windows Server 2008, Windows 7 or Windows Server 2008 R2, a Svchost.exe process that hosts the remote procedure call (RPC) service crashes. When this issue occurs, the following error message is logged in the Application log:
Event Type: Error
Event Source: Application Event Category: None Event ID: 1000 Date: <date> Time: <time> User: N/A Computer: <computer> Description: Faulting application svchost.exe version <version>, faulting module rpcrt4.dll, version <version>, fault address <address>. Cause
This error occurs because the remote procedure call service does not wait for all the asynchronous RPC calls to be returned before the service reallocates the structure. Because of this behavior, the asynchronous RPC calls access an incorrect reallocated address. Therefore, an access violation occurs, and the RPC service crashes.
ResolutionHotfix informationA supported hotfix is available from Microsoft. However, this hotfix is intended to correct only the problem that is described in this article. Apply this hotfix only to systems that are experiencing the problem described in this article. This hotfix might receive additional testing. Therefore, if you are not severely affected by this problem, we recommend that you wait for the next software update that contains this hotfix.If the hotfix is available for download, there is a "Hotfix download available" section at the top of this Knowledge Base article. If this section does not appear, contact Microsoft Customer Service and Support to obtain the hotfix. |
Thursday, 27 November 2014
How To Segment A Small LAN Using Tagged VLANs
Ask Tech Support Specialists Now
How To Segment A Small LAN Using Tagged VLANs
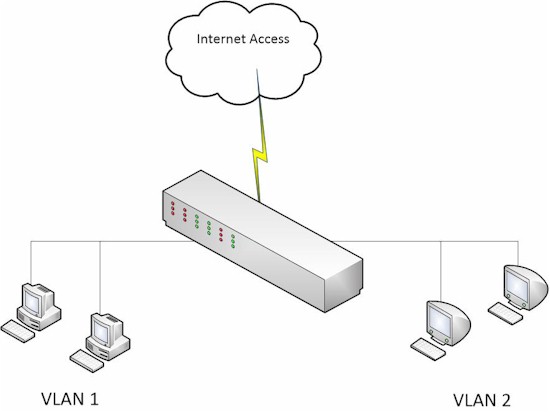
Introduction
VLANs, or Virtual LANs, are a useful technology for segmenting a network. I covered some VLAN basics awhile back in this article. Implementing VLANs in a small network can be simple or tricky, depending on the VLAN capabilities of your switch and router. For example, what should you do if you want to use VLANs with a VLAN-capable switch, but your router doesn't support VLANs?Example 1: Port-based VLAN switch
Let's say you have a VLAN-capable "smart" switch, but your router doesn't support VLANs. Your goal is to segment traffic on the switch in multiple VLANs to prevent devices on one VLAN from accessing devices in the other VLAN, but allow all devices to access the Internet. A simple solution is to set up port-based VLANs on the switch.Start by enabling port-based VLANs and creating three VLANs on the switch. VLAN 1 will be for the internet, VLAN 2 will be for one set of devices and VLAN 3 will be for another set of devices. Below shows a NETGEAR GS108Tv1 enabled for port-based VLANs with VLANs 1-3 created.
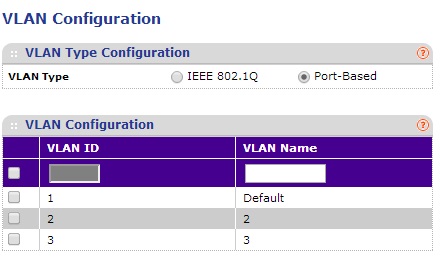
NETGEAR GS108Tv1 Enable Port-Based VLAN
Next, assign VLANs to the appropriate ports. Assign VLAN 1 to port 1 and connect your router to port 1 on the switch. Now assign VLAN 2 to ports 1 and 2. Finally, assign VLAN 3 to ports1 and 3.In the screenshots below from a NETGEAR GS108Tv1, port 1 is a member of VLANs 1, 2, and 3. Port 2 is a member of only VLAN 2. Port 3 is a member of only VLAN 3. To add more devices to one of the VLANs, simply add their ports to either VLAN 2 or VLAN 3.
NETGEAR GS108Tv1 Port-Based VLAN Assignments
The end result of this example is devices in VLAN 2 can access the Internet and each other and devices in VLAN 3 can access the Internet and each other. But devices in VLAN 2 cannot access devices in VLAN 3 and vice versa.Example 2: 802.1Q Switch
Let's say you have a switch supporting 802.1Q VLANs, but not port-based VLANs, the same no-VLAN router and want to segment traffic as you did in Example 1.It's helpful to clarify some terms first. 802.1Q, sometimes referred to as VLAN tagging, is a standard technology that defines how data traffic is tagged with a VLAN ID. Tagging traffic with a VLAN ID allows the traffic to remain a member of a VLAN as it is passed from one port to another, or from one device to another. 802.1Q specifies that all traffic is tagged with a VLAN ID, except traffic on the port's native VLAN. A port's native VLAN is also known as the the PVID, or Port VLAN Identifier.
802.1Q VLANs can have different port types. An access port is an 802.1Q VLAN port that can be assigned to a single VLAN only. It is typically used to connect to end devices such as PCs. A trunk port is an 802.1Q VLAN port that can carry traffic for multiple VLANs and is typically used to interconnect 802.1Q VLAN capable switches and routers. Some switches use general ports, which are a hybrid between access and trunk ports and can carry traffic for multiple VLANs.
To implement the Example 1 solution using 802.1Q VLAN technology, enable 802.1Q on the switch and create the three VLANs as you did in the port-based VLAN example. In this example, I'm going to again use a NETGEAR GS108Tv1, which supports both port-based and 802.1Q VLANs. The below configurations will also work on many NETGEAR switches, including a NETGEAR GS108Tv2. As you can see below, I've enabled 802.1Q and created VLANs 1-3.
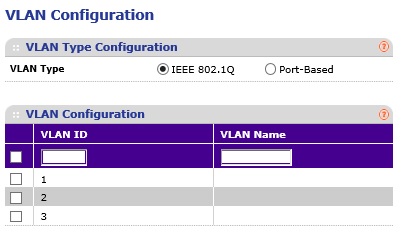
NETGEAR GS108Tv1 Enable 802.1Q VLANs
Then, if your switch allows for setting VLAN port type to access, trunk, or general, set the ports to general. Some switches, such as the NETGEAR GS108Tv1 and NETGEAR GS108Tv2 (and most NETGEAR switches I've reviewed,) allow all ports to be members of multiple 802.1Q VLANs so you don't have to set VLAN port type. Other switches, such as the Cisco SG200-26, which I'll cover in the last example, require you to change the VLAN port type to general for this kind of configuration.Next, assign VLANs to the appropriate ports with the untagged designation, which is a "U" on the NETGEAR GS108Tv1, and make all ports untagged members of VLAN 1. Then make ports for one set of devices untagged members of VLAN 2 and set ports for the other set of devices untagged members of VLAN 3. As you can see in the composite image below from a NETGEAR GS108Tv1, all ports are untagged members of VLAN 1, ports 1 and 2 are untagged members of VLAN 2, and ports 1 and 3 are untagged members of VLAN 3.
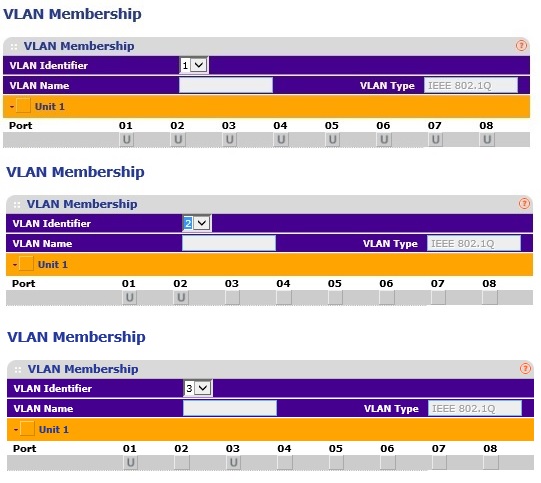
NETGEAR GS108Tv1 802.1Q VLAN Assignments
The last step is to set the PVIDs. Set the PVID on the port connected to the router as VLAN 1. Set the PVID on the ports for one set of devices to VLAN 2. Set the PVID for the ports for the other set of devices to VLAN 3. Below is a screen shot of the NETGEAR GS108Tv1 PVID settings.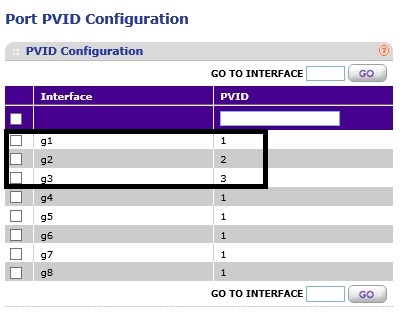
NETGEAR GS108Tv1 802.1Q PVID Assignments
With this configuration, the device connected to port 2 can't access the device connected to port 3 and vice-versa. But both devices have internet access. To add more devices, configure their ports as untagged members of VLAN 2 or VLAN 3 and make their PVID either VLAN 2 or VLAN 3.How To Segment A Small LAN Using Tagged VLANs - Example 3, Example 4, Closing
Example 3: ZyXEL GS1900-8HP
In the above two examples, I used VLANs 1-3. You can use any VLANs you want, as long as you have the port configurations correct.Here's a configuration summary of the following screenshots:
- VLAN 2 = Internet, VLAN 3 = PC 1, VLAN 4 = PC 2.
- Port 6 is connected to my router. Port 6 is an untagged member of VLAN 2, 3, and 4 with a PVID of 2.
- Port 7 is connected to PC 1. Port 7 is an untagged member of VLAN 2 and 3 with a PVID of 3.
- Port 8 is connected to PC 2. Port 8 is an untagged member of VLAN 2 and 4 with a PVID of 4.
Zyxel GS1900-8HP 802.1Q VLAN Assignments
...the second screen shot shows the PVID configuration.Zyxel GS1900-8HP 802.1Q PVID Assignments
With this configuration, PC 1 and PC 2 can access the Internet but not each other. To add another device in the same VLAN as PC 1 or PC 2, configure the port as an untagged member of VLAN 2 and an untagged member of either VLAN 3 or 4, plus set the PVID to either VLAN 3 or 4.Example 4: Cisco SG200-26
To perform the same configurations on a Cisco SG200-26 switch, which only supports 802.1Q, the approach is similar to Example 3. Simply create the desired VLANs, configure the interfaces as general and make all interfaces untagged members of the Internet VLAN. Then assign the appropriate interfaces as untagged members of their desired VLAN and, finally, assign PVIDs.The screenshot below shows the VLAN port-types, VLAN assignments, and PVID assignments on the Cisco SG200-26. Notice in the Mode column that all three interfaces are configured as "General." I used VLAN 4 for the Internet and VLANs 51 and 52 for PCs. A "U" after the VLAN ID indicates untagged, and a "P" after a VLAN ID indicates PVID.
Here's a config summary of the below screenshot:
- Interface GE10 is connected to PC 1. Interface GE10 is an untagged member of VLAN 4 and 51 with a PVID of 51.
- Interface GE11 is connected to PC 2. Interface GE11 is an untagged member of VLAN 4 and 52 with a PVID of 52.
- Interface GE12 is connected to my router. Interface GE12 is an untagged member of VLAN 4, 51 and 52 with a PVID of 4.
Cisco SG200-26 802.1Q Configuration
With this configuration, PC 1 and PC 2 can access the Internet but not each other. To add another device in the same VLAN as PC 1 or PC 2, configure the switch interface as general, make it an untagged member of VLAN 4 and an untagged member of either VLAN 51 or 52 and set the interface PVID to either VLAN 51 or 52.While this example was done on a Cisco SG200-26, the Cisco SG200-08 and SG200-08P use similar configurations.
Closing
In all the examples, all end devices are in the same IP address range (subnet) and the router doesn't support VLANs. It is also interesting to note in Examples 2-4 using 802.1Q VLANs, we don't actually use tagging, since we set all ports to be untagged members of the various VLANs.If you look closely at the VLAN assignments in the port-based and 802.1Q examples, you can see that the router/Internet port is a member of all VLANs for both port-based and 802.1Q. The difference is the PC ports are members of only one VLAN in a port-based config, whereas PC ports are members of the Internet VLAN and their native VLAN in an 802.1Q config.
These examples are limited to segmenting a wired network using VLANs only on ports of a smart / managed switch. In a future article, I'll cover how to use 802.1Q VLANs using ports on both a router and switch, as well as how to use 802.1Q VLANs to segment a wireless network.
Below is a table of switches I've used or reviewed that lists whether they support port-based and/or 802.1Q VLANs.
| Switch | Port-Based | 802.1Q |
|---|---|---|
| Cisco SG200-26 | N | Y |
| Cisco SG500-28P | N | Y |
| HP PS1810 | Y | Y |
| LG-Ericsson ES-2026 | Y | Y |
| NETGEAR GS108Tv1 | Y | Y |
| NETGEAR GS108Tv2 | N | Y |
| NETGEAR GS510TP | N | Y |
| NETGEAR GS716T | N | Y |
| NETGEAR GS724TR | N | Y |
| NETGEAR M4100 | N | Y |
| TRENDnet TEG160WS | N | Y |
| TP-LINK TL-SG108E | Y | Y |
| TP-LINK TL-SG2008 | N | Y |
| TP-LINK TL-SG2216 | N | Y |
| ZyXEL GS1900-8HP | N | Y |
On the other hand, 802.1Q is a standard technology that is supported by most VLAN-capable switches. The bottom line, as shown in these examples, is you can use port-based or 802.1Q VLANs to segment any small network.
Wednesday, 19 November 2014
How To Fix ERROR_NOT_FOUND 0x80070490 During Windows 7 SP1 Installation
How To Fix ERROR_NOT_FOUND 0x80070490 During Windows 7 SP1 Installation
 Well, this one took ages. And whenever something takes me ages, rather than write it down in my personal notes, I prefer to put it out online for everyone with the same problem to easily find and benefit from.
The problem I'm talking about today is trying to upgrade your Windows 7 installation to SP1 by applying Microsoft's update KB976932, called "Windows 7 Service Pack 1 for x64-based Systems" and getting nothing but a failure every time. The same problem may affect 32-bit systems as well, and I'm not sure what the update number for that would be, but the solution should work for either one.
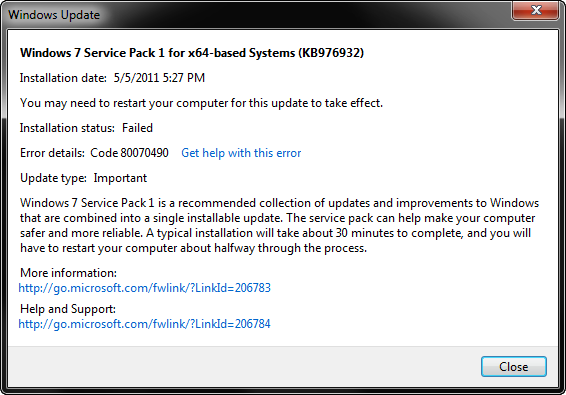
The update starts just fine, chugs along for 10 minutes or so, then reboots the system and starts performing more operations, when suddenly one of them fails about 10% down the road, reboots, and reverts the whole process. You end up with this message (code 80070490) and a failure for which there are a lot of useless "solutions" on the web that just don't work.
Except for one. I can't take credit for it – all I did was spend a month weeding through the crap, retrying, and getting nowhere, until a genius by the name Ben-IS came up with exactly the right diagnosis and provided exactly the right solution. This solution, in my own interpretation, is below.
Step 1
We are going to use a utility called SFC (System File Checker or Windows Resource Checker), which is part of the Windows installation. It will help diagnose the problem.Open up a command prompt (cmd) as administrator and run
sfc /scannowThis will run for a while and produce a file called CBS.log which you can find in %WINDIR%\Logs\CBS (usually C:\Windows\Logs\CBS). See this KB929833 for more info on SFC and CBS (Component Based Servicing).
sfc /scannowEven though there are no integrity violations, we should have enough info in the log to diagnose the problem.
Beginning system scan. This process will take some time.
Beginning verification phase of system scan.
Verification 100% complete.
Windows Resource Protection did not find any integrity violations.
Step 2
Unfortunately, Windows overwrote my CBS.log, so I'll go by the one Ben-IS provided.Open up CBS.log and look for something like Failed uninstalling driver updates or 0x80070490 – ERROR_NOT_FOUND.
If you have this line, which you should if you're reading this post, you should also see lines similar to these a few lines above:
2011-04-14 12:02:33, Info CBS Doqe: q-uninstall: Inf: usbvideo.inf, Ranking: 2, Device-Install: 0, Key: 598, Identity: usbvideo.inf, Culture=neutral, Type=driverUpdate, Version=6.1.7600.16543, PublicKeyToken=31bf3856ad364e35, ProcessorArchitecture=amd64, versionScope=NonSxSOne of these .inf files is the culprit, and we're going to find out which one in the next step.
2011-04-14 12:02:33, Info CBS Doqe: q-uninstall: Inf: sffdisk.inf, Ranking: 2, Device-Install: 0, Key: 599, Identity: sffdisk.inf, Culture=neutral, Type=driverUpdate, Version=6.1.7600.16438, PublicKeyToken=31bf3856ad364e35, ProcessorArchitecture=amd64, versionScope=NonSxS
2011-04-14 12:02:33, Info CBS Doqe: q-uninstall: Inf: sdbus.inf, Ranking: 2, Device-Install: 0, Key: 600, Identity: sdbus.inf, Culture=neutral, Type=driverUpdate, Version=6.1.7600.16438, PublicKeyToken=31bf3856ad364e35, ProcessorArchitecture=amd64, versionScope=NonSxS
Step 3
Now open up a different log file located at %WINDIR%\inf\setupapi.dev.log (normally c:\Windows\inf\setupapi.dev.log).Look for a line that contains Failed to find driver update or FAILURE(0x00000490).
Note the exact path to the .inf file that failed. In my case, it was:
sto: Failed to find driver update 'C:\Windows\WinSxS\amd64_usbvideo.inf_31bf3856ad364e35_6.1.7600.16543_none_8a1a2513d42628c3\usbvideo.inf' in Driver Store. Error = 0x00000490
Step 4
This is the key to the whole operation. Open up the command prompt again (cmd) as administrator and runpnputil -a INSERT_FILE_NAME_FROM_STEP_3For example, I ran
pnputil -a C:\Windows\WinSxS\amd64_usbvideo.inf_31bf3856ad364e35_6.1.7600.16543_none_8a1a2513d42628c3\usbvideo.infYou should see the following dialog:
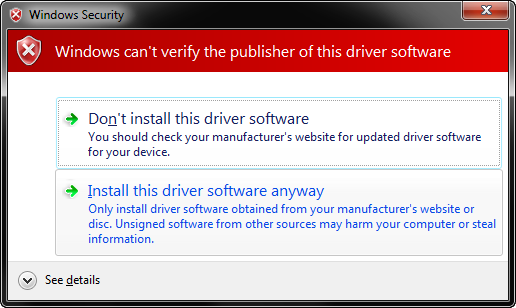
Choose Install this driver software anyway.
The end result should be something like this:
pnputil -a C:\Windows\WinSxS\amd64_usbvideo.inf_31bf3856ad364e35_6.1.7600.16543_none_8a1a2513d42628c3\usbvideo.infRepeat this step for any failures found in step 3.
Microsoft PnP Utility
Processing inf : usbvideo.inf
Driver package added successfully.
Published name : oem69.inf
Total attempted: 1
Number successfully imported: 1
Step 5
Apply the SP1 Windows Update again – it should now install successfully.And voila – enjoy your SP1!
Thursday, 13 November 2014
Win 8.1 Pastel no companies showing up
on windows 8.1, we must change the permissions in the registry to full control to add the companies in pastel
Hkey_Current _User \Software\Classes\VirtualStore\Machine\Software\Wow6432node\Softline\pastel V12
If encounter the problem
Wednesday, 12 November 2014
Exchange 2010 Error: Unable to mount database
Ask Tech Support Specialists Now
Microsoft Exchange Error--------------------------------------------------------
Failed to mount database 'Mailbox Database'.
Mailbox Database 0610509261
Failed
Error:
Couldn't mount the database that you specified. Specified database: Mailbox Database; Error code: An Active Manager operation failed. Error: The database action failed. Error: Operation failed with message: MapiExceptionCallFailed: Unable to mount database. (hr=0x80004005, ec=-515)
. [Database: Mailbox Database, Server: server.domain.local].
An Active Manager operation failed. Error: The database action failed. Error: Operation failed with message: MapiExceptionCallFailed: Unable to mount database. (hr=0x80004005, ec=-515)
. [Database: Mailbox Database, Server: server.domain.local]
An Active Manager operation failed. Error: Operation failed with message: MapiExceptionCallFailed:
. [Server: server.domain.local]
MapiExceptionCallFailed: Unable to mount database. (hr=0x80004005, ec=-515)
A. You have a corrupted database or corrupted logs. Several tests need to be performed, to see what the issue is (this is an example for Exchange 2010, but it works for previous versions as well):
Check and Repair the database
1. Check the database:
eseutil /mh "C:\Program Files\Microsoft\Exchange Server\V14\Mailbox\Mailbox Database\Mailbox Database.edb"
Look for the following in the output: State: Dirty Shutdown
1.a Since the database has not been properly shut down, it needs to be repaired.
Make sure you make a backup of the database before attemting any kind of repairs
To repair, run the following:
eseutil /p "C:\Program Files\Microsoft\Exchange Server\V14\Mailbox\Mailbox Database\Mailbox Database.edb"
1.b Re-run the database check from 1.a and if all goes well, you should see this somewhere in the output: State: Clean Shutdown
You can try mounting the database. If it mounts, you are good to go, if it doesn't you have to check the logs:
Check and Repair the database logs
2. Check the exchange logs (don't forget to specify E00 - the starting sequence for the logs)
eseutil /ml "C:\Program Files\Microsoft\Exchange Server\V14\Mailbox\Mailbox Database\E00"
2.a There will be a list of logs and depending on their state, you may get an error. (They should all say OK, if the logs are clean) Errors vary, but most likely it is a file corruption and needs a chkdsk to run.
As a sidenote, if the database state is Clean Shutdown you can safely remove the logs.
Monday, 27 October 2014
Increase maximum size pst-files
Increase maximum size pst-files
I heard that the default size for pst-files is 20 GB but also that there must be a registry value that allows to increase the maximum up to approximately 4PB (4096TB).
How do I increase the maximum file size of an UNICODE pst file?
In Outlook 2003 and Outlook 2007, the maximum size of a Unicode pst-file has indeed been limited to 20GB. In Outlook 2010 and 2013, this limit has been set to 50GB.How do I increase the maximum file size of an UNICODE pst file?
You can increase (but also decrease) this limit via the Registry or via Group Policies.
Note: This tip does not apply to pst-files who are in the Outlook 97-2002 format (ANSI formatted pst-files).
Via the Registry
You need to go to the following location in the Registry;- Outlook 2003
HKEY_CURRENT_USER\Software\Microsoft\Office\11.0\Outlook\PST - Outlook 2007
HKEY_CURRENT_USER\Software\Microsoft\Office\12.0\Outlook\PST - Outlook 2010
HKEY_CURRENT_USER\Software\Microsoft\Office\14.0\Outlook\PST - Outlook 2013
HKEY_CURRENT_USER\Software\Microsoft\Office\15.0\Outlook\PST
WarnLargeFileSize
Don’t set this higher than4090445042(decimal) orf3cf3cf2(hexadecimal)MaxLargeFileSize
Don’t set this higher than4294967295(decimal) orffffffff(hexadecimal)
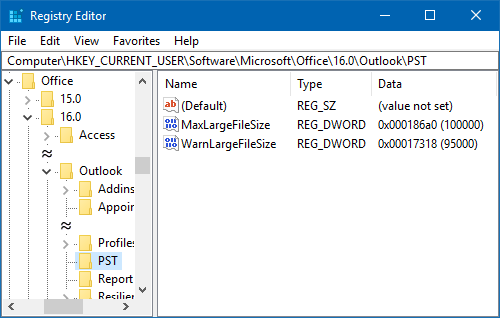
Above the maximum size of a pst-file has been set to 100GB with a warning at 95GB.
Via Group Policies
Not comfortable editing the Registry? You can then use Group Policies as well even when you are on a home computer. For instructions on how to use Group Policies see this guide.The settings for adjusting the pst filesize can be found in the section Miscellaneous-> PST Settings. The following 2 settings need to be modified;
- Large PST: Absolute maximum size
Don’t set this higher than4294967295 - Large PST: Size to disable adding new content
Don’t set this higher than4090445042
Tuesday, 7 October 2014
Windows 7 Offline files will not go Online when connected to network
Issue
Several laptop users move between networks, domain, home, etc and when they attempt to access DFS shares explorer status is working offline. The issue only resolves it self after a reboot. Connecting directly to the share works and i am able to ping network resources. This behavior occurs for VPN users as well.
Possible Causes
"slow-link mode". In win7 (with default settings) a client will enter slow-link mode if the latency to the server is above 80ms. In slow-link mode all writes are made to the local cache and a background sync only happens every 6 hours. Depending on your connection the default slow link detection speed is 64,000 bps
On client computers running Windows 7 or Windows Server 2008 R2, a shared folder automatically transitions to the slow-link mode if the round-trip latency of the network is greater than 80 milliseconds, or as configured by the "Configure slow-link mode" policy. After transitioning a folder to the slow-link mode, Offline Files synchronizes the user's files in the background at regular intervals, or as configured by the 'Configure Background Sync' policy. While in slow-link mode, Windows periodically checks the connection to the folder and brings the folder back online if network speeds improve.
If you do not configure the "Configure slow-link mode" policy setting, computers running Windows Vista or Windows Server 2008 will not transition a shared folder to the slow-link mode. Computers running Windows 7 or Windows Server 2008 R2 will use the default latency value of 80 milliseconds when transitioning a folder to the slow-link mode. To prevent computers running Windows 7 or Windows Server 2008 R2 from using the slow-link mode, disable this policy.
Option 1 Disable it in the Group policy to see if it helps (feedback welcome),
Check the following two policy settings that control the offline file slow-link mode and speed:
Path: Computer Policy\Administrative Templates\Network\Offline Files
Policies:
*Configure slow-link mode
*Configure slow-link speed
Option 2 Configure Forced silent auto reconnection
1. Click Start, type REGEDIT in search bar, and then click OK.
2. Locate and click the following registry subkey:
HKEY_LOCAL_MACHINE\Software\Microsoft\Windows\CurrentVersion\NetCache
3. Click Edit, point to New, and then click DWORD Value.
4. Type SilentForcedAutoReconnect, and then press ENTER to name the value.
5. Double-click SilentForcedAutoReconnect.
6. In the Value data box, type 1, and then click OK.
Option3 Computer Policy\Administrative Templates\Network\Offline Files\Action on server disconnect
Tip: To configure this setting without establishing a setting, in Windows Explorer, on the Tools menu, click Folder Options, click the Offline Files tab, click Advanced, and then select an option in the "When a network connection is lost" section.
Also, see the "Non-default server disconnect actions" setting.
Friday, 26 September 2014
Microsoft Access could not find file C:\windows\system32\system.mdw
Problem
You receive the error ‘Microsoft Access could not find file C:\windows\system32\system.mdw’ when trying to open up Microsoft Access
Reason
The problem is down to permissions to the mdw file, the system.mdw file is a security file in access, this has most likely gone wrong if someone has modified or deleteted the system.mdw file.
Solution
1) Go to C:\Windows\System32\ and search for system.mdw, if it exists rename it to system.mdw.backup
2) Run program wrkgadm.exe
3) Click Create
4) Change the worgroup ID to either your workgroup name or domain name
5) Click OK
6) Click Join (Not always neccesary but worth doing)
7) Select your system.mdw file
8) Open Up Microsoft Access
Thursday, 25 September 2014
Ctrl-Alt-Del in Hyper-V and RDP
Periodically I have to look this up again, so I’m putting it here for future reference and for anyone else who needs it.
To send Ctrl-Alt-Del to a remote desktop (RDP) session, press Ctrl-Alt-End.
To send Ctrl-Alt-Del to a virtual machine when you are RDP’d into the Hyper-V host, press RtCtrl-Del. You must use the right-hand control button.
To send Ctrl-Alt-Del to a remote desktop (RDP) session, press Ctrl-Alt-End.
To send Ctrl-Alt-Del to a virtual machine when you are RDP’d into the Hyper-V host, press RtCtrl-Del. You must use the right-hand control button.
Wednesday, 17 September 2014
\windows\system32\config\system is corrupt
Perform the System Restore Inside the Recovery Console type the following commands to change the directory to the system restore directory:
If you get an Access Denied error:click here
If you don't get an Access Denied error :

If there is no _resto~1 folder or if there are no restore points inside it:click here
If the _resto~1 folder exists, inside it there are several folders named RP1, RP2. These are restore points. RP1 is the oldest restore point. You can use
to view what RP folders are available. If no restore points are available click here. Otherwise choose the most convenient RP folder. Supposing we have RP3 available let's type in:

Change the directory to snapshot:
Restore the main registry branches. If you are being asked if you want to overwrite type in y to agree.

Type exit to reboot the system. Start the computer normally
| cd \ cd system~1 |
If you get an Access Denied error:click here
If you don't get an Access Denied error :
| cd _resto~1 |

If there is no _resto~1 folder or if there are no restore points inside it:click here
If the _resto~1 folder exists, inside it there are several folders named RP1, RP2. These are restore points. RP1 is the oldest restore point. You can use
| dir |
to view what RP folders are available. If no restore points are available click here. Otherwise choose the most convenient RP folder. Supposing we have RP3 available let's type in:
| cd rp3 |

Change the directory to snapshot:
| cd snapshot |
Restore the main registry branches. If you are being asked if you want to overwrite type in y to agree.
| copy _registry_machine_system c:\windows\system32\config\system copy _registry_machine_software c:\windows\system32\config\software The following commands are most of the time optional however the process might not work if they are not executed copy _registry_machine_security c:\windows\system32\config\security copy _registry_machine_sam c:\windows\system32\config\sam copy _registry_user_.default c:\windows\system32\config\default |

Type exit to reboot the system. Start the computer normally
NTLDR is missing
Difficulty: Easy
Time Required: Restoring the NTLDR and Ntdetect.com files from the Windows XP CD usually takes less than 15 minutes
Here's How:
Time Required: Restoring the NTLDR and Ntdetect.com files from the Windows XP CD usually takes less than 15 minutes
Here's How:
- Enter Windows XP Recovery Console.
- When you reach the command prompt (detailed in Step 6 in the link above), type the following two commands, pressing Enter after each one:
copy d:\i386\ntldr c:\
In the command listed above, d represents the drive letter assigned to the optical drive that your Windows XP CD is currently in. While this is most often d, your system could assign a different letter. Also, c:\ represents the root folder of the partition that Windows XP is currently installed on. Again, this is most often the case but your system could be different.copy d:\i386\ntdetect.com c:\ - If you're prompted to overwrite either of the two files, press Y.
- Take out the Windows XP CD, type exit and then press Enter to restart your PC.
Assuming that missing or corrupt versions of the NTLDR and/or Ntdetect.com files were your only issues, Windows XP should now start normally.
Thursday, 28 August 2014
A program is trying to send an e-mail message on your behalf
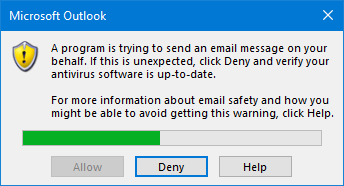
Trust Center Settings
Since Outlook 2007, no security prompts will be shown when you have a virus scanner installed which reports its status to Windows and reports its status as “Valid”.- Outlook 2007
Tools-> Trust Center…-> Programmatic Access - Outlook 2010 and Outlook 2013
File-> Options-> Trust Center-> Trust Center Settings…-> Programmatic Access
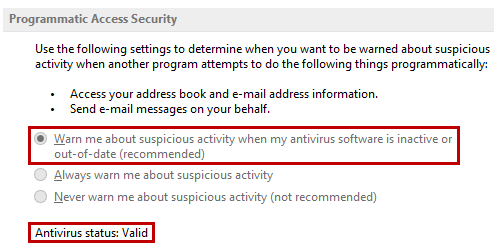
In this configuration, you shouldn’t get any security prompts. The greyed out settings can only be changed when you start Outlook with administrative privileges.
The greyed out settings above determine whether or not a prompt is being shown. The default setting is: Warn me about suspicious activity when my antivirus software is inactive or out-of-date (recommended)
This means that a security prompt is only triggered when your antivirus status is reported as “Invalid”.
The other 2 options either always show or never show security prompts regardless of the antivirus status.
As the settings are greyed out, you can only change them when you start Outlook with administrator privileges. You can do this from the context menu that you get when you hold the SHIFT button while right clicking on the Outlook shortcut button in Taskbar while Outlook is closed. For other methods and detailed instructions with screenshots see:
Group Policy and Registry settings
 Within a domain, an administrator can deploy the Programmatic Access Security settings via Group Policies to prevent the security prompts from ever showing up.
For this, the following options should then be set:
- Configure Outlook to use Group Policy Security settings
Administrative Templates-> Microsoft Outlook <version>-> Security-> Security Form Settings-> option: Outlook Security mode-> setting: Use Outlook Security Group Policy - Set the Guard Behavior to Automatically Approve for each prompt
Administrative Templates-> Microsoft Outlook <version>-> Security-> Security Form Settings-> Programmatic Security
Key:
HKEY_CURRENT_USER\Software\Policies\Microsoft\Office\<version>\Outlook\SecurityValue name:
AdminSecurityModeValue type:
REG_DWORDValue:
3Key:
HKEY_CURRENT_USER\Software\Policies\Microsoft\Office\<version>\Outlook\SecurityValue name:
PromptOOMSendValue name:
PromptOOMAddressBookAccessValue name:
PromptOOMAddressInformationAccessValue name:
PromptOOMMeetingTaskRequestResponseValue name:
PromptOOMSaveAsValue name:
PromptOOMFormulaAccessValue name:
PromptSimpleMAPISendValue name:
PromptSimpleMAPINameResolveValue name:
PromptSimpleMAPIOpenMessageValue type: REG_DWORDValue:
2 You’ll find Registry files to disable all the Programmatic Security prompts for Outlook 2007, Outlook 2010 and Outlook 2013 in the download below for use in non-domain environments.
Download: disableprogrammaticsecurity.zip
http://www.msoutlook.info/question/883
Friday, 22 August 2014
Folder Redirection/Sync Breaking on many machines
I can confirm that the Lenovo application "Rapidboot" was the cause of the Offline files issue. Uninstalling Rapidboot immediately resolved the issue. The Sync Center icon now appears as it should, and there are Sync Partnerships again.
Now to develop a script that uninstalls Lenovo Rapidboot from every Corporate machine
Friday, 8 August 2014
Fix for Adobe Reader X spiking CPU and AcroRd32.exe process not closing properly
Windows Registry Editor Version 5.00
[HKEY_CURRENT_USER\Software\Adobe\Acrobat Reader\10.0\IPM]
"bShowMsgAtLaunch"=dword:00000000
"bDontShowMsgWhenViewingDoc"=dword:00000001
See more at: http://www.itninja.com/blog/view/fix-for-adobe-reader-x-spiking-cpu-and-process-not-closing-properly#sthash.2MlQb7K6.dpuf
Friday, 9 May 2014
Internet Explorer cannot display the webpage when you try to open DropBox on a Windows XP SP2
Just install SP3 for Windows XP
dropbox.com
fanfiction.net
pinterest.com
sendspace.com
soundcloud.com
splitwise.com
spotify.com
twitter.com
wordpress.com
Just install SP3 for Windows XP
Following is a short list of websites that are known to
require WinXP Service Pack 3 when using Chrome (and also IE browser) starting
April 2014:
coursera.org dropbox.com
fanfiction.net
pinterest.com
sendspace.com
soundcloud.com
splitwise.com
spotify.com
twitter.com
wordpress.com
Thursday, 24 April 2014
XP Error on Boot
(WIndows could not start because the following file is missing or corrupt:
\WINDOWS\SYSTEM32\CONFIG\SYSTEM)
Boot with Hirens CD Mini XP
Go to C:\Windows\system32\config and rename system to system.bak
Copy system from C:\windows\repair to C:\windows\system32\config
Reboot pc and it should work normally.
This can be done via the repair console as well
1/ Insert the Windows XP CD into the CD-ROM and restart your pc.
2/ At the ‘Welcome to Setup’ screen press R to start the recovery Console.
3/ The Recovery Console will now open and the list of Windows installations will
appear.
4/ As you only have one installation on your PC you need to press the number which is
relevant to your installations location. This, obviously will typically be 1 (one).
5/ When requested type in your Administrator password. If you haven’t set an
administrator password, then simply press Enter.
6/ The Recovery Console command prompt window will now appear.
7/ At the Command prompt type the following, pressing Enter after you have typed each
line. It is assumed that your root directory will be C: However, if your root
directory isn't C:, for example, if you have other partitions/drives on your system
you may have installed XP to say the D: drive, the you will need to substitute each
reference to C: with the letter of your root directory.
* md tmp
* copy c:\windows\system32\config\system
* c:\windows\tmp\system.bak
* copy c:\windows\system32\config\software
* c:\windows\tmp\software.bak
* copy c:\windows\system32\config\sam
* c:\windows\tmp\sam.bak
* copy c:\windows\system32\config\security
* c:\windows\tmp\security.bak
* copy c:\windows\system32\config\default
* c:\windows\tmp\default.bak
* delete c:\windows\system32\config\system
* delete c:\windows\system32\config\software
* delete c:\windows\system32\config\sam
* delete c:\windows\system32\config\security
* delete c:\windows\system32\config\default
* copy c:\windows\repair\system c:\windows\system32\config\system
* copy c:\windows\repair\software c:\windows\system32\config\software
* copy c:\windows\repair\sam c:\windows\system32\config\sam
* copy c:\windows\repair\security c:\windows\system32\config\security
* copy c:\windows\repair\default c:\windows\system32\config\default
8/ Now type Exit to exit the recovery console.
\
Tuesday, 22 April 2014
VBS Script to clean all users profile (XP - Win8)
'
' Clean All Temp Etc.
'
' version 3.75
'
' by Jonathan Brickman, a substantial rewrite and
' enhancement of a core originally written by David Barrett
'
' last mod 2014-02-17
' Added clearing of profile WER data
' Added clearing of profile localappdata temp folders
' Fixed a few visual buglets
' Added clearing of Windows Error Reporting queue
' Added explicit search for system profiles
' Added clearing of Google Chrome cache
' Improved type setting for free space reports
' Added report as to how much space freed
' Added usability as SYSTEM user under Windows 7 et al.
' Added item ticks (comma for files, slash for subfolders)
'
' Core originally written by David Barrett
' Copyright 2009
' http://www.cedit.biz/
' This script is licensed under the Creative Commons
' Attribution 2.5 Licence
' http://creativecommons.org/licenses/by/2.5/
'
' You are free to use it for both personal and
' commercial purposes, so long as full attribution
' is given to the author (David Barrett).
'
' This notice must not be removed
'
' Substantially Enhanced by Jonathan E. Brickman
'
'
force_cscript
dim objWSH, objFSO, sysDrv
dim initialFreeSpace
dim strComputer
dim objRegistry
dim strKeyPath, objSubKey, arrSubkeys, strValueName
dim sProfile
dim sTemp, sTmp, sWindows, sLocalAppData, sProgramData, sWER, sDotNetItem
wscript.echo "CleanAllTemp"
wscript.echo ""
wscript.echo "originally by David Barrett"
wscript.echo "updated and modded substantially by Jonathan E. Brickman"
wscript.echo ""
wscript.echo "Cleans all profiles' temp and IE cache folders"
wscript.echo "A whole subfolder deletion is indicated by \"
wscript.echo "A file deletion is indicated by ,"
wscript.echo ""
set objFSO = CreateObject("Scripting.FileSystemObject")
set objWSH = CreateObject("WScript.Shell")
set sysDrv = objFSO.GetDrive(objFSO.GetDriveName(objWSH.ExpandEnvironmentStrings("%SystemDrive%")))
sTemp = objWSH.ExpandEnvironmentStrings("%TEMP%")
sTmp = objWSH.ExpandEnvironmentStrings("%TMP%")
sWindows = objWSH.ExpandEnvironmentStrings("%SystemRoot%")
sLocalAppData = objWSH.ExpandEnvironmentStrings("%LOCALAPPDATA%")
sProgramData = objWSH.ExpandEnvironmentStrings("%ProgramData%")
If sProgramData <> "" Then
sWER = objWSH.ExpandEnvironmentStrings("%ProgramData%") & "\Microsoft\Windows\WER\ReportQueue"
Else
sWER = ""
End If
' Get current free space on system drive
initialFreeSpace = CDbl(sysDrv.FreeSpace)
Const HKEY_LOCAL_MACHINE = &H80000002
strComputer = "."
Set objRegistry=GetObject("winmgmts:\\" & _
strComputer & "\root\default:StdRegProv")
strKeyPath = "SOFTWARE\Microsoft\Windows NT\CurrentVersion\ProfileList"
objRegistry.EnumKey HKEY_LOCAL_MACHINE, strKeyPath, arrSubkeys
For Each objSubkey In arrSubkeys
strValueName = "ProfileImagePath"
strSubPath = strKeyPath & "\" & objSubkey
objRegistry.GetExpandedStringValue HKEY_LOCAL_MACHINE,strSubPath,strValueName,sProfile
wscript.echo "Cleaning profile folder: " & sProfile
DeleteFolderContents sProfile & "\Local Settings\Temp"
DeleteFolderContents sProfile & "\Local Settings\Temporary Internet Files\Content.IE5"
DeleteFolderContents sProfile & "\Local Settings\Temporary Internet Files"
DeleteFolderContents sProfile & "\AppData\Local\Google\Chrome\User Data\Default\Cache"
DeleteFolderContents sProfile & "\AppData\Local\TEMP"
DeleteFolderContents sProfile & "Application Data\Local\Microsoft\Windows\WER"
Next
' Now empty the windows\temp folder if not the same
wscript.echo "Processing folder: " & sWindows & "\Temp"
DeleteFolderContents sWindows & "\Temp"
' And ditto the system-wide Windows Error Reporting queue, if it exists.
If sWER <> "" Then
wscript.echo "Processing folder: " & sWER
DeleteFolderContents sWER
End If
wscript.Echo ""
WScript.echo "Freed " & CLng( CDbl(CDbl(sysDrv.FreeSpace) - CDbl(initialFreeSpace))/CDbl(1024*1024)) & " megabytes."
Set sysDrv = Nothing
Set objWsH = Nothing
Set objFSO = Nothing
Set objRegistry = Nothing
' ---------------------- Subroutines -------------------
sub DeleteFolderContents(strFolder)
' Deletes all files and folders within the given folder
dim objFolder, objFile, objSubFolder, itemCount
on error resume next
itemCount = 0
set objFolder=objFSO.GetFolder(strFolder)
if Err.Number<>0 then
Err.Clear
Exit sub ' Couldn't get a handle to the folder, so can't do anything
end if
for each objSubFolder in objFolder.SubFolders
objSubFolder.Delete true
if Err.Number<>0 then
'Try recursive delete (ensures better result)
Err.Clear
DeleteFolderContents(strFolder & "\" & objSubFolder.Name)
else
wscript.stdout.write "\"
itemCount = itemCount + 1
end if
next
for each objFile in ObjFolder.Files
objFile.Delete true
if Err.Number<>0 then
Err.Clear ' In case we couldn't delete a file
else
wscript.stdout.write ","
itemCount = itemCount + 1
end if
next
Set objFolder = Nothing
if itemCount > 0 then
wscript.stdout.write vbCRLF
end if
end sub
sub force_cscript
dim args : args=""
dim i, wshshell
If right(lCase(wscript.fullname),11)= "wscript.exe" then
for i=0 to wscript.arguments.count-1
args = args & wscript.arguments(i) & " "
next
Set WshShell = CreateObject("wscript.shell")
wshshell.run wshshell.ExpandEnvironmentStrings("%comspec%") & _
" /c cscript.exe //nologo """ & wscript.scriptfullname & """" & args
set wshshell=nothing
wscript.quit
end if
end sub
'
' Clean All Temp Etc.
'
' version 3.75
'
' by Jonathan Brickman, a substantial rewrite and
' enhancement of a core originally written by David Barrett
'
' last mod 2014-02-17
' Added clearing of profile WER data
' Added clearing of profile localappdata temp folders
' Fixed a few visual buglets
' Added clearing of Windows Error Reporting queue
' Added explicit search for system profiles
' Added clearing of Google Chrome cache
' Improved type setting for free space reports
' Added report as to how much space freed
' Added usability as SYSTEM user under Windows 7 et al.
' Added item ticks (comma for files, slash for subfolders)
'
' Core originally written by David Barrett
' Copyright 2009
' http://www.cedit.biz/
' This script is licensed under the Creative Commons
' Attribution 2.5 Licence
' http://creativecommons.org/licenses/by/2.5/
'
' You are free to use it for both personal and
' commercial purposes, so long as full attribution
' is given to the author (David Barrett).
'
' This notice must not be removed
'
' Substantially Enhanced by Jonathan E. Brickman
'
'
force_cscript
dim objWSH, objFSO, sysDrv
dim initialFreeSpace
dim strComputer
dim objRegistry
dim strKeyPath, objSubKey, arrSubkeys, strValueName
dim sProfile
dim sTemp, sTmp, sWindows, sLocalAppData, sProgramData, sWER, sDotNetItem
wscript.echo "CleanAllTemp"
wscript.echo ""
wscript.echo "originally by David Barrett"
wscript.echo "updated and modded substantially by Jonathan E. Brickman"
wscript.echo ""
wscript.echo "Cleans all profiles' temp and IE cache folders"
wscript.echo "A whole subfolder deletion is indicated by \"
wscript.echo "A file deletion is indicated by ,"
wscript.echo ""
set objFSO = CreateObject("Scripting.FileSystemObject")
set objWSH = CreateObject("WScript.Shell")
set sysDrv = objFSO.GetDrive(objFSO.GetDriveName(objWSH.ExpandEnvironmentStrings("%SystemDrive%")))
sTemp = objWSH.ExpandEnvironmentStrings("%TEMP%")
sTmp = objWSH.ExpandEnvironmentStrings("%TMP%")
sWindows = objWSH.ExpandEnvironmentStrings("%SystemRoot%")
sLocalAppData = objWSH.ExpandEnvironmentStrings("%LOCALAPPDATA%")
sProgramData = objWSH.ExpandEnvironmentStrings("%ProgramData%")
If sProgramData <> "" Then
sWER = objWSH.ExpandEnvironmentStrings("%ProgramData%") & "\Microsoft\Windows\WER\ReportQueue"
Else
sWER = ""
End If
' Get current free space on system drive
initialFreeSpace = CDbl(sysDrv.FreeSpace)
Const HKEY_LOCAL_MACHINE = &H80000002
strComputer = "."
Set objRegistry=GetObject("winmgmts:\\" & _
strComputer & "\root\default:StdRegProv")
strKeyPath = "SOFTWARE\Microsoft\Windows NT\CurrentVersion\ProfileList"
objRegistry.EnumKey HKEY_LOCAL_MACHINE, strKeyPath, arrSubkeys
For Each objSubkey In arrSubkeys
strValueName = "ProfileImagePath"
strSubPath = strKeyPath & "\" & objSubkey
objRegistry.GetExpandedStringValue HKEY_LOCAL_MACHINE,strSubPath,strValueName,sProfile
wscript.echo "Cleaning profile folder: " & sProfile
DeleteFolderContents sProfile & "\Local Settings\Temp"
DeleteFolderContents sProfile & "\Local Settings\Temporary Internet Files\Content.IE5"
DeleteFolderContents sProfile & "\Local Settings\Temporary Internet Files"
DeleteFolderContents sProfile & "\AppData\Local\Google\Chrome\User Data\Default\Cache"
DeleteFolderContents sProfile & "\AppData\Local\TEMP"
DeleteFolderContents sProfile & "Application Data\Local\Microsoft\Windows\WER"
Next
' Now empty the windows\temp folder if not the same
wscript.echo "Processing folder: " & sWindows & "\Temp"
DeleteFolderContents sWindows & "\Temp"
' And ditto the system-wide Windows Error Reporting queue, if it exists.
If sWER <> "" Then
wscript.echo "Processing folder: " & sWER
DeleteFolderContents sWER
End If
wscript.Echo ""
WScript.echo "Freed " & CLng( CDbl(CDbl(sysDrv.FreeSpace) - CDbl(initialFreeSpace))/CDbl(1024*1024)) & " megabytes."
Set sysDrv = Nothing
Set objWsH = Nothing
Set objFSO = Nothing
Set objRegistry = Nothing
' ---------------------- Subroutines -------------------
sub DeleteFolderContents(strFolder)
' Deletes all files and folders within the given folder
dim objFolder, objFile, objSubFolder, itemCount
on error resume next
itemCount = 0
set objFolder=objFSO.GetFolder(strFolder)
if Err.Number<>0 then
Err.Clear
Exit sub ' Couldn't get a handle to the folder, so can't do anything
end if
for each objSubFolder in objFolder.SubFolders
objSubFolder.Delete true
if Err.Number<>0 then
'Try recursive delete (ensures better result)
Err.Clear
DeleteFolderContents(strFolder & "\" & objSubFolder.Name)
else
wscript.stdout.write "\"
itemCount = itemCount + 1
end if
next
for each objFile in ObjFolder.Files
objFile.Delete true
if Err.Number<>0 then
Err.Clear ' In case we couldn't delete a file
else
wscript.stdout.write ","
itemCount = itemCount + 1
end if
next
Set objFolder = Nothing
if itemCount > 0 then
wscript.stdout.write vbCRLF
end if
end sub
sub force_cscript
dim args : args=""
dim i, wshshell
If right(lCase(wscript.fullname),11)= "wscript.exe" then
for i=0 to wscript.arguments.count-1
args = args & wscript.arguments(i) & " "
next
Set WshShell = CreateObject("wscript.shell")
wshshell.run wshshell.ExpandEnvironmentStrings("%comspec%") & _
" /c cscript.exe //nologo """ & wscript.scriptfullname & """" & args
set wshshell=nothing
wscript.quit
end if
end sub
Friday, 4 April 2014
Exchange 2007 and 2010 error
(The name on the security certificate is invalid or does not match the name of the site)

Cut and paste the following and replace the EXCHANGESERVER for the name of your Exchange Server and the Domain for your domain.
Set-ClientAccessServer -Identity EXCHANGESERVER -AutoDiscoverServiceInternalUri https://mail.yourdomain.com/Autodiscover/Autodiscover.xml
Set-WebServicesVirtualDirectory -Identity “EXCHANGESERVER\EWS (Default Web Site)” -InternalURL https://mail.yourdomain.com/EWS/Exchange.asmx -BasicAuthentication:$true
Set-OABVirtualDirectory -Identity “EXCHANGESERVER\OAB (Default Web Site)” -InternalURL https://mail.yourdomain.com/OAB
Set-ActiveSyncVirtualDirectory -Identity “EXCHANGESERVER\Microsoft-Server-ActiveSync (Default Web Site)” -ExternalURL https://mail.yourdomain.com/Microsoft-Server-Activesync
Onl do this if you are using OutlookAnyware
Enable-OutlookAnywhere -Server EXCHANGESERVER -ExternalHostname “mail.yourdomain.com” -ClientAuthenticationMethod “Basic”-SSLOffloading:$False
(The name on the security certificate is invalid or does not match the name of the site)
- Do not use a self signed certificate
- Get one from a Certificate authority like Godaddy and make sure
- to add autodiscover.yourdomain.com, mail.yourdomaim.com (The dns name you use externally) or you can add a wild card like *.yourdomain.com
Cut and paste the following and replace the EXCHANGESERVER for the name of your Exchange Server and the Domain for your domain.
Set-ClientAccessServer -Identity EXCHANGESERVER -AutoDiscoverServiceInternalUri https://mail.yourdomain.com/Autodiscover/Autodiscover.xml
Set-WebServicesVirtualDirectory -Identity “EXCHANGESERVER\EWS (Default Web Site)” -InternalURL https://mail.yourdomain.com/EWS/Exchange.asmx -BasicAuthentication:$true
Set-OABVirtualDirectory -Identity “EXCHANGESERVER\OAB (Default Web Site)” -InternalURL https://mail.yourdomain.com/OAB
Set-ActiveSyncVirtualDirectory -Identity “EXCHANGESERVER\Microsoft-Server-ActiveSync (Default Web Site)” -ExternalURL https://mail.yourdomain.com/Microsoft-Server-Activesync
Onl do this if you are using OutlookAnyware
Enable-OutlookAnywhere -Server EXCHANGESERVER -ExternalHostname “mail.yourdomain.com” -ClientAuthenticationMethod “Basic”-SSLOffloading:$False
Subscribe to:
Posts (Atom)


